如何在WordPress评论表单中添加jQuery工具提示
评论允许用户使用您网站上的内容。这就是为什么我们认为对您的评论布局和评论表单进行样式设置很重要,因此它既方便用户又看起来很好看。最近,用户问我们如何在WordPress评论表单中添加jQuery工具提示。我们认为其他人也可能觉得这很有用。在本教程中,我们将向您展示如何在WordPress评论表单中添加jQuery工具提示。

为什么要添加jQuery工具提示?
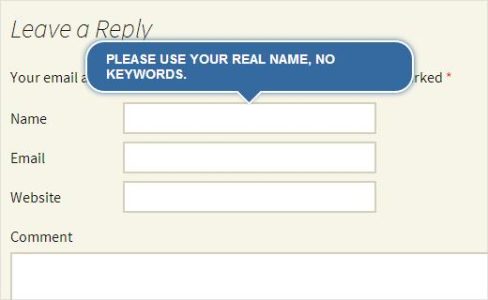
当用户将鼠标移动到某个项目时,会显示工具提示,通常会提供有关该特定项目的说明。在本教程中,我们将添加jQuery工具提示以显示提示,请在评论表单字段中使用您的真实姓名。
通过添加jQuery工具提示,您可以增强用户体验,并且它看起来更好。
如何添加jQuery工具提示
首先,您需要做的是在桌面上创建一个文件夹并命名WPB注释,工具提示。在此文件夹中,您需要创建以下三个文件:
- WPB注释,tooltips.php
- WPB-tooltip.css
- WPB-tooltip.js
使用像记事本这样的纯文本编辑器来创建这些文件。创建文件后,需要打开WPB注释,tooltip.php在文本编辑器中。将此代码复制并粘贴到文件中:
<?php

// Only load our scripts and style when a comment form is displayed

add_action( "comment_form_before", "comment_tooltips" );

function comment_tooltips() {
wp_enqueue_script("wpb-tooltip-jquery", plugins_url("/wpb-tooltip.js", __FILE__ ), array("jquery-ui-tooltip"), "", true);
wp_enqueue_style("wpb-tooltip-css", plugins_url("/wpb-tooltip.css", __FILE__), false, null);
}

// Modify comment form fields and add title attribute to form input fields

function alter_comment_form_fields($fields){
    $fields["email"] =  "<p class="comment-form-email"><label for="email">" . __( "Email", "twentythirteen" ) . "</label> " .
      ( $req ? "<span class="required">*</span>" : "" ) .
      "<input id="email" title="Your email is safe with us, see our privacy policy." name="email" type="text" value="" . esc_attr(  $commenter["comment_author_email"] ) .
      "" size="30"" . $aria_req . " /></p>";
    $fields["url"] = "<p class="comment-form-url"><label for="url">" .
      __( "Website", "twentythirteen" ) . "</label>" .
      "<input id="url" name="url" title="Your website or any social media profile URL" type="text" value="" . esc_attr( $commenter["comment_author_url"] ) .
      "" size="30" /></p>";
	  $fields["author"] = "<p class="comment-form-author">" .
      "<label for="author">" . __( "Name", "twentythirteen" ) . "</label> " .
      ( $req ? "<span class="required">*</span>" : "" ) .
      "<input id="author" title="Please use your real name, no keywords." name="author" type="text" value="" . esc_attr( $commenter["comment_author"] ) .
      "" size="30"" . $aria_req . " /></p>";
    return $fields;
}
add_filter("comment_form_default_fields","alter_comment_form_fields");
?>
在上面的代码中,我们首先创建了一个插件头,给这个插件一个名称和描述。之后我们加载JavaScript和CSS文件(请参阅我们的指南,了解如何在WordPress中添加JavaScript和样式)。
我们还确保仅在显示评论表单时加载这些文件。之后我们修改了默认注释表单并在输入字段中添加了title属性。此title属性包含我们希望在工具提示中显示的消息。例如,在作者字段中我们使用了:
title =“请使用您的真实姓名,不要使用关键字。”
现在您已经创建了插件文件,现在是时候添加一些jQuery了。打开tooltip.js文件并在其中添加此代码:
(function($) {
$( "#commentform" ).tooltip({ position: {
	my: "center bottom-10",
        at: "center top",
        using: function( position, feedback ) {
          $( this ).css( position );
          $( "<div>" )
            .addClass( "arrow" )
            .addClass( feedback.vertical )
            .addClass( feedback.horizontal )
            .appendTo( this );
        } } });
})(jQuery);
在这段代码中,#commentform是jQuery将显示工具提示的选择器.tooltip.Tooltip是我们定义工具提示位置的内容部分。
现在最后一步是添加一点CSSWPB-tooltip.css文件。只需复制并粘贴此代码:
.ui-tooltip, .arrow:after {
    background: #356aa0;
    border: 2px solid white;
  }
  .ui-tooltip {
    padding: 10px 20px;
    color: white;
    border-radius: 20px;
    font: bold 14px "Helvetica Neue", Sans-Serif;
    text-transform: uppercase;
    box-shadow: 0 0 7px #356aa0;
	max-width:350px;
  }
  .arrow {
    width: 70px;
    height: 16px;
    overflow: hidden;
    position: absolute;
    left: 50%;
    margin-left: -35px;
    bottom: -16px;
  }
  .arrow.top {
    top: -16px;
    bottom: auto;
  }
  .arrow.left {
    left: 20%;
  }
  .arrow:after {
    content: "";
    position: absolute;
    left: 20px;
    top: -20px;
    width: 25px;
    height: 25px;
    box-shadow: 6px 5px 9px -9px #356aa0;
    -webkit-transform: rotate(45deg);
    -moz-transform: rotate(45deg);
    -ms-transform: rotate(45deg);
    -o-transform: rotate(45deg);
    tranform: rotate(45deg);
  }
  .arrow.top:after {
    bottom: -20px;
    top: auto;
  }
随意修改此CSS文件以满足您的需求。
就这样。现在您已经成功创建了一个插件,可以在WordPress评论表单中添加jQuery工具提示。您需要做的就是上传注释,工具提示从桌面到的文件夹/可湿性粉剂内容/插件/使用Filezilla等FTP客户端在Web服务器上创建目录。上传插件后,转到插件WordPress管理区域中的页面并激活插件。